Wednesday, February 7, 2024

Tapioca Pearls with Coconut Milk


It has taken me years and years to be able to publish this recipe, but here it is. First trying to find Tapioca pearls in Spain, which seemed an impossible task, only Sago pearls, which is not the same. THEN, finding a good and simple recipe. Found one in Australia and then lost it. But This recipe really has helped me to nail this dessert. Thank you to this person. Sometimes the most simple recipes are the hardest, and this one seems to be one of them.

So I have just spent today 2 hours throwing a ton of tapioca away after failed attempts. Bad videos everywhere in the internet. This is why I keep this blog, to have things ready to go, or you have to watch and read hours of recipes again. Okay so it is the starch of the tapioca which makes this simple recipe complex, because if you are not careful the whole thing becomes a gelatin mess. But here is the solution. 

INGREDIENTS:
-1/2 cup of tapioca pearls.

-1/2 cup of sugar.
-1 pinch of salt.
-1 can of coconut milk.
-5 cups of water (1.200 ml)

STEPS:
1. Get 5 cups of water and bring to boil. Now, to this boiling water add the tapioca pearls, no rinsing and no nothing, just straight from the package to the pot.
2. Stir them in the boiling water for about 7-8 minutes. Stir, and stir and stir and stir while you listen to your favourite podcast.
3. Now rinse them in cold water, lots of them and set them apart. They will still have a white centre, they will be half-cooked, like in the photo.
4. Now set in the same pot the coconut milk and 1/2 cup of water. Bring to a boil and quickly add the sugar that will dissolve instantly and the salt. Stir quickly and mix it all. 
5. Now add the tapioca pearls and stir, stir, and stir for 15 minutes in medium fire. They willl be cooking through, stir, and stir. 
6. Now lower fire to a minimum and let the tapioca pearls absorb the milk remaining, maybe cover, but be really careful to not let them stick to bottom or burn. 

That's it. Tadah. 

Great texture, just like in Thai restaurant. If it is not sweet enough, just sprinkle some caster sugar and it will be fix it. The dish gets better with time, because the flavours come together.

Finally I nailed this. This was one of my fave desserts in the whole world. And now I've eaten so much tapioca this evening, that I'm going to explode. 
Pics: Singapore.

Friday, January 12, 2024

My Christmas and Easter Lamb


So the story of this lamb mold started last Easter when Kenton and I ate pizza for Resurrection Sunday and it was the most depressing thing ever. 
-"We need traditions!", I told him.  

So I went back into Pinterest and looked into my Easter pins and found this awesome lamb cake so my friend Cristina, brought it all the way from me from the USA.

25 bucks is a great investment for this mold! and I thought: why not use it for Christmas? At the end of the day we celebrate the birth of the Lamb of God, so I made it of chocolate. 

And here is the winner recipe that rocked my world. A heavy, very chocolaty cake. I followed the recipe that cake with the mold, but then added a ton of dutch cocoa. YUUUUUUM you all. This recipe is a keeper, even my mom agreed.
 

INGREDIENTS

-1/2 cup of butter, 115 grams 
-2 eggs
-3/4 cup of buttermilk
-1 tsp baking soda
-1+1/2 tsp of baking powder
-2 cups of flour, 240 grams.
-100 grams of chocolate 70%.
-4 tablespoons of Dutch cocoa.
-1 cup of white sugar, 200 grams.

STEPS:
1. Mix butter and sugar and vanilla and eggs until light and fluffy with mixer.
2. Now add to the mix, the dry ingredients: flour, baking powder, baking soda.
3. Then add the 100 grams of chocolate melted (in the microwave will do), the buttermilk and then the cocoa powder
4. Butter the mold well, with a lot of butter and then sprinkle with a lot of flour. This is key for your lamb to work well. 
5. Bake in 180 degrees for about 40 minutes.
6. Let it cool off for a long time! and then sprinkle it with powder sugar. Wow. Gorgeous lamb.

The mold is from Nordic Ware Spring by the way. And the blueberry recipe lamb is from my blueberries muffins.
  

Thursday, January 11, 2024

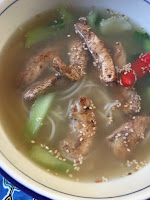
Asian Chicken Noodle Broth by Jamie Oliver


This soup of Jamie Oliver is fantastic. I cannot recommend more his book "The Ministry of Food" in which he teaches people to cook from scratch. So good. If you only have one cooking book, have this one. If you master that book, you are a great cook already.

Back to the recipe. Simple. The key ingredient to have is "5 chinese spice", very popular and not hard to find.  

INGREDIENTS:
Broth: 
-2 litres of chicken stock. 
-A piece of ginger.
-Serrano peppers for spiciness (optional).
-2 tablespoons of soy sauce.
-1 lime.
-sesame seeds and some toasted nuts (optional)
---------
-500 grams of chicken.
-300 grams of noodles.
-2 bock choy or a handful of mangetouts.

STEPS:
1. Cut chicken in stripes and coat them well with 5 chinese spice, like in the photo. Now sautee them in medium fire until golden (be careful to not burn the spices, have medium fire). Once ready set it apart.
2. Cook which ever noodles you want separately. You can add them too in the broth and cook them there, but I like to do it separately because the broth them is more clear.
3. Get the broth going separately. Put the chicken stock,  2 litres of water, and the ginger together, bring it to a boil.
4. Once it boils, add the green beans for 2 minutes. 
5. After 2 minutes in which the green beans have softened but are still very crunchy, add noodles and chicken, bring it to boil again and immediately turn off fire.
6. Now finally add 2 tablespoons of soy sauce and stir. 
7. The finally touch is: squeeze in each bowl the lime, half lime for each bowl and sprinkle sesame seeds. The sesame seeds are optional but the lime is not optional, it makes it 5 times better.
Voila. C'est magnifique.